I have been trying to install phonetisaurus (https://code.google.com/p/phonetisaurus/), which relies on OpenFST (http://www.openfst.org). Both packages would compile without any red flags, but when I would try to run phonetisaurus, I would the the following error:
error while loading shared libraries: libfst.so.1: wrong ELF class: ELFCLASS32
This error led me on a wild goose chase trying to explicitly specify that both programs should be compiled for a 64-bit architecture. In fact, what I really needed to do was to run sudo ldconfig. I did this after installing OpenFST and before compiling phonetisaurus. Problem solved.
Tuesday, November 12, 2013
Wednesday, May 30, 2012
LaTeX: "Rerun to get crossreferences right" won't go away
Today I was trying to use the hyperref and varioref packages in the same document, and a large table (containing a bunch of references) was causing a perpetual "Rerun to get crossreferences right" error, as well as some page breaking problems. I inserted a \pagebreak where I wanted the break to be, and the "Rerun" warning went away. Even better, the layout engine was able to do the right thing.
Hej då!
Hej då!
Wednesday, February 15, 2012
LaTeX: left-justify, center, right-justify on same line
Here's a quick LaTeX hack to left-justify, center, and right-justify text all on the same line:
\newcommand{\lrc}[3]{%
\noindent%
\makebox[0pt][l]{#1}%
\hfill%
\makebox[0pt][c]{#2}%
\hfill%
\makebox[0pt][r]{#3}%
}
Hej då!
\newcommand{\lrc}[3]{%
\noindent%
\makebox[0pt][l]{#1}%
\hfill%
\makebox[0pt][c]{#2}%
\hfill%
\makebox[0pt][r]{#3}%
}
Hej då!
Wednesday, December 28, 2011
Faking a baseline grid in LaTeX
A baseline grid is kind of like virtual lined paper for your
document. The idea is that any text on the page should be sitting on one
of the grid lines. When it works properly, it provides a harmonious
vertical distribution of text, and ensures that lines of text that stand
side-by-side on a page (for example, body text and a sidebar, or two
columns in a table) line up on the same baselines.
Officially, LaTeX doesn't provide support for a baseline grid. But with a little luck, you just might be able to fake it. In this blog post, I'll share some tips and hacks that helped me do that. I'm no TeXpert; if you know a better way, have additional pointers, or just really hate something I suggest, feel free to leave a comment. (Positive comments are also appreciated.)
Important caveat: so far, my baseline grid needs have been limited to single-page documents. I have no idea whether the methods described below will work beyond the first page of a document. If you decide to experiment with this, please share what you discover.
Drawing the grid
While drafting my document, I found it helpful to have the grid drawn in the background. That way, I could easily see when and where something wasn't cooperating. I don't promise the following is the best way or even the right way to do it, but here's how I did it:
\newcommand{\baselinegrid}{%
\raisebox{0pt}[\height][0pt]{\makebox[0pt][l]{%
\begin{minipage}[t]{\textwidth}%
\begin{color}{red}%
\rule{\textwidth}{.05pt}\linebreak%
\rule{\textwidth}{.05pt}\linebreak%
\rule{\textwidth}{.05pt}\linebreak%
\rule{\textwidth}{.05pt}\linebreak%
\rule{\textwidth}{.05pt}\linebreak%
\rule{\textwidth}{.05pt}\linebreak%
\rule{\textwidth}{.05pt}\linebreak%
\rule{\textwidth}{.05pt}\linebreak%
\rule{\textwidth}{.05pt}\linebreak%
\rule{\textwidth}{.05pt}\linebreak%
\rule{\textwidth}{.05pt}\linebreak%
\rule{\textwidth}{.05pt}\linebreak%
\rule{\textwidth}{.05pt}\linebreak%
\rule{\textwidth}{.05pt}\linebreak%
\rule{\textwidth}{.05pt}\linebreak%
\rule{\textwidth}{.05pt}\linebreak%
\rule{\textwidth}{.05pt}\linebreak%
\rule{\textwidth}{.05pt}\linebreak%
\rule{\textwidth}{.05pt}\linebreak%
\rule{\textwidth}{.05pt}\linebreak%
\rule{\textwidth}{.05pt}\linebreak%
\rule{\textwidth}{.05pt}\linebreak%
\rule{\textwidth}{.05pt}\linebreak%
\rule{\textwidth}{.05pt}\linebreak%
\rule{\textwidth}{.05pt}\linebreak%
\rule{\textwidth}{.05pt}\linebreak%
\rule{\textwidth}{.05pt}\linebreak%
\rule{\textwidth}{.05pt}\linebreak%
\rule{\textwidth}{.05pt}\linebreak%
\rule{\textwidth}{.05pt}\linebreak%
\rule{\textwidth}{.05pt}\linebreak%
\rule{\textwidth}{.05pt}\linebreak%
\rule{\textwidth}{.05pt}\linebreak%
\rule{\textwidth}{.05pt}\linebreak%
\rule{\textwidth}{.05pt}\linebreak%
\rule{\textwidth}{.05pt}\linebreak%
\rule{\textwidth}{.05pt}\linebreak%
\rule{\textwidth}{.05pt}\linebreak%
\rule{\textwidth}{.05pt}\linebreak%
\rule{\textwidth}{.05pt}\linebreak%
\rule{\textwidth}{.05pt}\linebreak%
\rule{\textwidth}{.05pt}\linebreak%
\rule{\textwidth}{.05pt}\linebreak%
\rule{\textwidth}{.05pt}\linebreak%
\rule{\textwidth}{.05pt}\linebreak%
\rule{\textwidth}{.05pt}\linebreak%
\rule{\textwidth}{.05pt}\linebreak%
\rule{\textwidth}{.05pt}\linebreak%
\rule{\textwidth}{.05pt}\linebreak%
\rule{\textwidth}{.05pt}\linebreak%
\rule{\textwidth}{.05pt}\linebreak%
\rule{\textwidth}{.05pt}\linebreak%
\rule{\textwidth}{.05pt}\linebreak%
\rule{\textwidth}{.05pt}\linebreak%
\rule{\textwidth}{.05pt}\linebreak%
\end{color}
\end{minipage}%
}}}
Call this macro immediately before typesetting any text in your document. For example:
Comment out the \baselinegrid before producing your final draft.
Setting the leading (and font size) by hand
In LaTeX, you don't normally set your own leading (line spacing). Usually, if anything, you set \baselinestretch and LaTeX takes care of the rest whenever the font size changes. You also generally don't set specific point sizes for your text; instead, you use relative commands like \footnotesize, \large, and \huge. But if you want to use a baseline grid, it's imperative that your leading stay consistent: if not the same value throughout the document, at least some integral multiple of the base value. The only way I know to specify leading directly in LaTeX is with \fontsize{fontsize}{leading}. For the change to take effect, \fontsize has to be followed by a command that sets the font, such as \selectfont (for folks using the fontspec package, a call to \fontspec should work, too).
The leading value you specify should thereafter be accessible as the length \baselineskip. It's not normally recommended to use \baselineskip directly in LaTeX documents, but with a baseline grid, if you need to specify the space between two lines in the grid, I don't know of anything more handy.
Because it's crucial to control leading at all times in your document, you'll have to find workarounds for commands that change font size (such as sectioning commands). I can't personally tell you how to do this, but heaven knows you wouldn't be the first person to redefine \section if it came to that.
If a change in font size at the beginning of a paragraph is messing up your document, you might try putting a \hspace{0pt}, possibly followed by a \linebreak, before the \fontsize.
Getting minipages lined up
Make your minipages line up properly by using the optional alignment parameter, for example, the [t] in
\begin{minipage}[t]{.4\textwidth}
This is probably also the thing to do with tabular environments and other similar things, but I haven't experimented with them.
Adding space between things
You can add space between lines using \linebreak or \vspace{\baselineskip} (or multiples thereof, such as \vspace{3\baselineskip}).
Lettrine fun
I wanted a paragraph to start with a lettrine (drop cap) in a different font than the rest of the paragraph. To prevent this from upsetting the baseline alignment, I needed to do it like so (I am using XeLaTeX with fontspec to change fonts):
\lettrine[lhang=0]{\fontspec[Scale=MatchUppercase]{Other Font}\textbf{D}}{rop}
The key bit in all that is [Scale=MatchUppercase]. This ensures that the lettrine's height will be an integral number of rows in the baseline grid, which in turn ensures that the text in the paragraph will sit neatly on grid lines.
List issues
LaTeX list environments typically add weird amounts of space both above and below the list and between the list items. The first step in my solution to this problem was to use the memoir document class and to issue the \tightlists command before my first list. The second step was to set lengths \topsep and \partopsep to zero (\partopsep seems to have been the value causing me trouble, but your mileage may vary). Because my lists were inside a minipage environment, I needed to set these values inside the minipage where the lists appeared. If you want space surrounding your list, you might try some multiple of your leading rather than zero.
Another thing I tried that seemed to result in baseline-aligned output was to make the list part of the preceding paragraph. I suspect this worked because \topsep was set to zero and \partopsep didn't apply to a "within-paragraph" list.
Multicol madness
The multicols environment is yet another place where LaTeX inserts gratuitous, non-linespace-sized amounts of vertical space. This extra space is tamed by setting \multicolsep (to zero, in my case).
The other issue I had with multicols is that it wants to balance columns more than it wants to align the contents of the columns to the baseline grid. To make it use unbalanced columns, issue the command \raggedcolumns before the first multicols environment you want to unbalance.
Other things to try
You now know pretty much everything I do about faking a baseline grid in LaTeX. If it's not enough, some other things you might try include:
Hej då!
Update 2011/12/30: packages for baseline grids and some math
So it turns out that other people have spent more time working this problem than me, and have come up with better solutions. Turns out there is a grid package which tries to force everything onto a baseline grid, as well as a gridset package for coercing off-grid things back onto a grid. These might have saved me a lot of time.
Before discovering those, I also discovered a way to determine the position of a given point on a page. Hàn Thế Thành built three useful commands into pdfTeX (which have also been incorporated into XeTeX): \pdfsavepos, \pdflastxpos, and \pdflastypos. I have no idea how to use these, but the savepos module of the zref package does (load this by entering \usepackage[savepos]{zref} in your preamble). zref-savepos provides three easy-to-use commands, \zsavepos{refname}, \zposx{refname}, and \zposy{refname}. \zsavepos records a location on a page, and \zposx and \zposy give you the x and y coordinates as numbers which represent scaled points (abbreviated sp; 65536sp = 1pt).
Now if only we could do some serious calculations with the results of these commands. Unfortunately, while LaTeX excels at typesetting math, it fails miserably at letting you do math in your source code. Fortunately, Till Tantau and Mark Wibrow have written a math engine as part of pgf which you can load using \usepackage{pgfmath}. Unfortunately, to quote the pgf manual,
So, before we can use pgfmath with the zref-savepos results, we need to convert those results to smaller numbers that pgfmath can handle. (Additionally, we have to accept that the results will be approximate.) Fortunately, pgfmath treats all dimensions (lengths) as points during internal calculations, and we can convert our zref-savepos results to dimensions like so: \newlength{myLen}\setlength{\myLen}{\zposy{refname}sp}. (In other words, create a new dimension register, and set it by appending the result of \zposy with "sp" to give it the appropriate scale.)
Enough preliminaries. Here's my attempt to put it all together into a pair of macros that can bump text back onto the grid if the previous box messed things up. The first macro, \startgrid, records the position of the first line of the document. It should be called just before the first text in your document. In addition to recording a position, it creates a bunch of registers that will be set in the next macro.
\newcommand{\startgrid}{%
\zsavepos{gridorigin}%
\newlength{\gridLenA}%
\newlength{\gridLenB}%
\newlength{\gridLenC}%
\newcounter{gridCounter}%
\setcounter{gridCounter}{0}%
\newcommand{\gridlabelname}{}
}
The second macro, \bumptogrid, records the position where the macro appears, does a calculation, and inserts a \vspace to make up the difference and get things back on the grid (in theory). The calculation is essentially (y1 - y2) MODULO b, where y1 is the y position of the first line in the document, y2 is the y position of the current line, and b is the value of \baselineskip.
\newcommand{\bumptogrid}{%
\stepcounter{gridCounter}%
\renewcommand{\gridlabelname}{gridlabel\arabic{gridCounter}}%
\zsavepos{\gridlabelname}%
\setlength{\gridLenA}{\zposy{gridorigin}sp}%
\setlength{\gridLenB}{\zposy{\gridlabelname}sp}%
\pgfmathsetlength{\gridLenC}{\gridLenA - \gridLenB - (round((\gridLenA - \gridLenB)/\baselineskip) * \baselineskip)}%
\vspace{\gridLenC}%
}
How well does it work? After a long minipage, it got things pretty darn close to the baseline (not perfectly on the line, but without a visual grid, you'd be hard-pressed to see the difference). In places where the baseline grid wasn't disrupted, however, \bumptogrid disrupted it. Goes to show what I've been saying all along: I don't really understand the inner workings of LaTeX. If these macros help you, more power to you; if not, my apologies.
Hej då igen!
Officially, LaTeX doesn't provide support for a baseline grid. But with a little luck, you just might be able to fake it. In this blog post, I'll share some tips and hacks that helped me do that. I'm no TeXpert; if you know a better way, have additional pointers, or just really hate something I suggest, feel free to leave a comment. (Positive comments are also appreciated.)
Important caveat: so far, my baseline grid needs have been limited to single-page documents. I have no idea whether the methods described below will work beyond the first page of a document. If you decide to experiment with this, please share what you discover.
Drawing the grid
While drafting my document, I found it helpful to have the grid drawn in the background. That way, I could easily see when and where something wasn't cooperating. I don't promise the following is the best way or even the right way to do it, but here's how I did it:
\usepackage{xcolor}
\raisebox{0pt}[\height][0pt]{\makebox[0pt][l]{%
\begin{minipage}[t]{\textwidth}%
\begin{color}{red}%
\rule{\textwidth}{.05pt}\linebreak%
\rule{\textwidth}{.05pt}\linebreak%
\rule{\textwidth}{.05pt}\linebreak%
\rule{\textwidth}{.05pt}\linebreak%
\rule{\textwidth}{.05pt}\linebreak%
\rule{\textwidth}{.05pt}\linebreak%
\rule{\textwidth}{.05pt}\linebreak%
\rule{\textwidth}{.05pt}\linebreak%
\rule{\textwidth}{.05pt}\linebreak%
\rule{\textwidth}{.05pt}\linebreak%
\rule{\textwidth}{.05pt}\linebreak%
\rule{\textwidth}{.05pt}\linebreak%
\rule{\textwidth}{.05pt}\linebreak%
\rule{\textwidth}{.05pt}\linebreak%
\rule{\textwidth}{.05pt}\linebreak%
\rule{\textwidth}{.05pt}\linebreak%
\rule{\textwidth}{.05pt}\linebreak%
\rule{\textwidth}{.05pt}\linebreak%
\rule{\textwidth}{.05pt}\linebreak%
\rule{\textwidth}{.05pt}\linebreak%
\rule{\textwidth}{.05pt}\linebreak%
\rule{\textwidth}{.05pt}\linebreak%
\rule{\textwidth}{.05pt}\linebreak%
\rule{\textwidth}{.05pt}\linebreak%
\rule{\textwidth}{.05pt}\linebreak%
\rule{\textwidth}{.05pt}\linebreak%
\rule{\textwidth}{.05pt}\linebreak%
\rule{\textwidth}{.05pt}\linebreak%
\rule{\textwidth}{.05pt}\linebreak%
\rule{\textwidth}{.05pt}\linebreak%
\rule{\textwidth}{.05pt}\linebreak%
\rule{\textwidth}{.05pt}\linebreak%
\rule{\textwidth}{.05pt}\linebreak%
\rule{\textwidth}{.05pt}\linebreak%
\rule{\textwidth}{.05pt}\linebreak%
\rule{\textwidth}{.05pt}\linebreak%
\rule{\textwidth}{.05pt}\linebreak%
\rule{\textwidth}{.05pt}\linebreak%
\rule{\textwidth}{.05pt}\linebreak%
\rule{\textwidth}{.05pt}\linebreak%
\rule{\textwidth}{.05pt}\linebreak%
\rule{\textwidth}{.05pt}\linebreak%
\rule{\textwidth}{.05pt}\linebreak%
\rule{\textwidth}{.05pt}\linebreak%
\rule{\textwidth}{.05pt}\linebreak%
\rule{\textwidth}{.05pt}\linebreak%
\rule{\textwidth}{.05pt}\linebreak%
\rule{\textwidth}{.05pt}\linebreak%
\rule{\textwidth}{.05pt}\linebreak%
\rule{\textwidth}{.05pt}\linebreak%
\rule{\textwidth}{.05pt}\linebreak%
\rule{\textwidth}{.05pt}\linebreak%
\rule{\textwidth}{.05pt}\linebreak%
\rule{\textwidth}{.05pt}\linebreak%
\rule{\textwidth}{.05pt}\linebreak%
\end{color}
\end{minipage}%
}}}
Call this macro immediately before typesetting any text in your document. For example:
\begin{document}
\fontsize{11}{15}\selectfont% we'll revisit this momentarily
\setlength{\parskip}{0pt}%
\setlength{\parindent}{0pt}%
\baselinegrid%
Here's some text...
%...
Comment out the \baselinegrid before producing your final draft.
Setting the leading (and font size) by hand
In LaTeX, you don't normally set your own leading (line spacing). Usually, if anything, you set \baselinestretch and LaTeX takes care of the rest whenever the font size changes. You also generally don't set specific point sizes for your text; instead, you use relative commands like \footnotesize, \large, and \huge. But if you want to use a baseline grid, it's imperative that your leading stay consistent: if not the same value throughout the document, at least some integral multiple of the base value. The only way I know to specify leading directly in LaTeX is with \fontsize{fontsize}{leading}. For the change to take effect, \fontsize has to be followed by a command that sets the font, such as \selectfont (for folks using the fontspec package, a call to \fontspec should work, too).
The leading value you specify should thereafter be accessible as the length \baselineskip. It's not normally recommended to use \baselineskip directly in LaTeX documents, but with a baseline grid, if you need to specify the space between two lines in the grid, I don't know of anything more handy.
Because it's crucial to control leading at all times in your document, you'll have to find workarounds for commands that change font size (such as sectioning commands). I can't personally tell you how to do this, but heaven knows you wouldn't be the first person to redefine \section if it came to that.
If a change in font size at the beginning of a paragraph is messing up your document, you might try putting a \hspace{0pt}, possibly followed by a \linebreak, before the \fontsize.
Getting minipages lined up
Make your minipages line up properly by using the optional alignment parameter, for example, the [t] in
\begin{minipage}[t]{.4\textwidth}
This is probably also the thing to do with tabular environments and other similar things, but I haven't experimented with them.
Adding space between things
You can add space between lines using \linebreak or \vspace{\baselineskip} (or multiples thereof, such as \vspace{3\baselineskip}).
Lettrine fun
I wanted a paragraph to start with a lettrine (drop cap) in a different font than the rest of the paragraph. To prevent this from upsetting the baseline alignment, I needed to do it like so (I am using XeLaTeX with fontspec to change fonts):
\lettrine[lhang=0]{\fontspec[Scale=MatchUppercase]{Other Font}\textbf{D}}{rop}
The key bit in all that is [Scale=MatchUppercase]. This ensures that the lettrine's height will be an integral number of rows in the baseline grid, which in turn ensures that the text in the paragraph will sit neatly on grid lines.
List issues
LaTeX list environments typically add weird amounts of space both above and below the list and between the list items. The first step in my solution to this problem was to use the memoir document class and to issue the \tightlists command before my first list. The second step was to set lengths \topsep and \partopsep to zero (\partopsep seems to have been the value causing me trouble, but your mileage may vary). Because my lists were inside a minipage environment, I needed to set these values inside the minipage where the lists appeared. If you want space surrounding your list, you might try some multiple of your leading rather than zero.
Another thing I tried that seemed to result in baseline-aligned output was to make the list part of the preceding paragraph. I suspect this worked because \topsep was set to zero and \partopsep didn't apply to a "within-paragraph" list.
Multicol madness
The multicols environment is yet another place where LaTeX inserts gratuitous, non-linespace-sized amounts of vertical space. This extra space is tamed by setting \multicolsep (to zero, in my case).
The other issue I had with multicols is that it wants to balance columns more than it wants to align the contents of the columns to the baseline grid. To make it use unbalanced columns, issue the command \raggedcolumns before the first multicols environment you want to unbalance.
Other things to try
You now know pretty much everything I do about faking a baseline grid in LaTeX. If it's not enough, some other things you might try include:
- absolute positioning of boxes (using the textpos package) or semi-absolute positioning using zero-width-and-height boxes like the one I used above to draw the grid
- packaging difficult boxes inside other boxes whose height you can specify (via \raisebox, maybe?)
- adding struts after boxes that come up short
- fiddling with \vspaces until things look about right
- throwing your arms up in frustration and switching to software with built-in support for baseline grids, such as ConTeXt (which can almost certainly do what you want, if only you could figure it out), Scribus (if you're willing to let certain other aspects of the typography suffer), or InDesign (if your pockets are lined with gold)
Hej då!
Update 2011/12/30: packages for baseline grids and some math
So it turns out that other people have spent more time working this problem than me, and have come up with better solutions. Turns out there is a grid package which tries to force everything onto a baseline grid, as well as a gridset package for coercing off-grid things back onto a grid. These might have saved me a lot of time.
Before discovering those, I also discovered a way to determine the position of a given point on a page. Hàn Thế Thành built three useful commands into pdfTeX (which have also been incorporated into XeTeX): \pdfsavepos, \pdflastxpos, and \pdflastypos. I have no idea how to use these, but the savepos module of the zref package does (load this by entering \usepackage[savepos]{zref} in your preamble). zref-savepos provides three easy-to-use commands, \zsavepos{refname}, \zposx{refname}, and \zposy{refname}. \zsavepos records a location on a page, and \zposx and \zposy give you the x and y coordinates as numbers which represent scaled points (abbreviated sp; 65536sp = 1pt).
Now if only we could do some serious calculations with the results of these commands. Unfortunately, while LaTeX excels at typesetting math, it fails miserably at letting you do math in your source code. Fortunately, Till Tantau and Mark Wibrow have written a math engine as part of pgf which you can load using \usepackage{pgfmath}. Unfortunately, to quote the pgf manual,
It should be noted that all calculations must not exceed ±16383.99999 at any point, because the underlying computations rely on TEX dimensions. This means that many of the underlying computations are necessarily approximate and that in addition, are not very fast.
So, before we can use pgfmath with the zref-savepos results, we need to convert those results to smaller numbers that pgfmath can handle. (Additionally, we have to accept that the results will be approximate.) Fortunately, pgfmath treats all dimensions (lengths) as points during internal calculations, and we can convert our zref-savepos results to dimensions like so: \newlength{myLen}\setlength{\myLen}{\zposy{refname}sp}. (In other words, create a new dimension register, and set it by appending the result of \zposy with "sp" to give it the appropriate scale.)
Enough preliminaries. Here's my attempt to put it all together into a pair of macros that can bump text back onto the grid if the previous box messed things up. The first macro, \startgrid, records the position of the first line of the document. It should be called just before the first text in your document. In addition to recording a position, it creates a bunch of registers that will be set in the next macro.
\newcommand{\startgrid}{%
\zsavepos{gridorigin}%
\newlength{\gridLenA}%
\newlength{\gridLenB}%
\newlength{\gridLenC}%
\newcounter{gridCounter}%
\setcounter{gridCounter}{0}%
\newcommand{\gridlabelname}{}
}
The second macro, \bumptogrid, records the position where the macro appears, does a calculation, and inserts a \vspace to make up the difference and get things back on the grid (in theory). The calculation is essentially (y1 - y2) MODULO b, where y1 is the y position of the first line in the document, y2 is the y position of the current line, and b is the value of \baselineskip.
\newcommand{\bumptogrid}{%
\stepcounter{gridCounter}%
\renewcommand{\gridlabelname}{gridlabel\arabic{gridCounter}}%
\zsavepos{\gridlabelname}%
\setlength{\gridLenA}{\zposy{gridorigin}sp}%
\setlength{\gridLenB}{\zposy{\gridlabelname}sp}%
\pgfmathsetlength{\gridLenC}{\gridLenA - \gridLenB - (round((\gridLenA - \gridLenB)/\baselineskip) * \baselineskip)}%
\vspace{\gridLenC}%
}
How well does it work? After a long minipage, it got things pretty darn close to the baseline (not perfectly on the line, but without a visual grid, you'd be hard-pressed to see the difference). In places where the baseline grid wasn't disrupted, however, \bumptogrid disrupted it. Goes to show what I've been saying all along: I don't really understand the inner workings of LaTeX. If these macros help you, more power to you; if not, my apologies.
Hej då igen!
Monday, September 12, 2011
Unable to handle kernel paging request
What I did to incur this error:
Upgraded from OpenSUSE 11.3 to 11.4 on my HP Pavilion DV7 laptop, which has both Intel HD integrated graphics and an ATI Radeon graphics card. I'm also dual-booting Windows 7; I'm using the GRUB bootloader.
When I get the error:
When OpenSUSE 11.4 is booting up; the error prevents bootup from continuing. Not cool.
The actual error message:
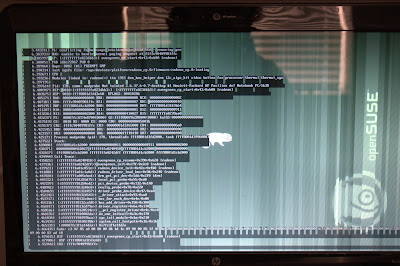
Below is a photo of my screen showing the error messages and much, much more (click for larger version):
How I fixed it:
On this OpenSUSE forum page, user SLPolak seems to have had a similar problem. User BeyondSora suggests the problem may stem from the KMS module. Googling around for information about KMS led me to the ArchLinux wiki entry for KMS. Based on information on that page, I added the GRUB startup option "radeon.modeset=0" before booting OpenSUSE. (At the risk of stating the obvious, you do this from the GRUB boot menu--the one that's presented to you when you're booting up your computer. Make sure the non-failsafe OpenSUSE 11.4 option in the GRUB menu is highlighted, then just start typing to edit the startup options.) If this works for you, you can follow these steps to make the change permanent:
Other things that sort of worked:
Things that didn't work:
Disclaimer:
I don't really know what I'm doing with this stuff. Somebody who has a better understanding of the inner workings of Linux might have a better solution, or know how to make the things that didn't work for me succeed. But if you're not that person, and this fix works for you, great.
Hej då!
Upgraded from OpenSUSE 11.3 to 11.4 on my HP Pavilion DV7 laptop, which has both Intel HD integrated graphics and an ATI Radeon graphics card. I'm also dual-booting Windows 7; I'm using the GRUB bootloader.
When I get the error:
When OpenSUSE 11.4 is booting up; the error prevents bootup from continuing. Not cool.
The actual error message:
fb: conflicting fb hw usage inteldrmfb vs VESA VGA - removing gen
BUG: unable to handle kernel paging request at ffffc90409981ffc
Below is a photo of my screen showing the error messages and much, much more (click for larger version):

How I fixed it:
On this OpenSUSE forum page, user SLPolak seems to have had a similar problem. User BeyondSora suggests the problem may stem from the KMS module. Googling around for information about KMS led me to the ArchLinux wiki entry for KMS. Based on information on that page, I added the GRUB startup option "radeon.modeset=0" before booting OpenSUSE. (At the risk of stating the obvious, you do this from the GRUB boot menu--the one that's presented to you when you're booting up your computer. Make sure the non-failsafe OpenSUSE 11.4 option in the GRUB menu is highlighted, then just start typing to edit the startup options.) If this works for you, you can follow these steps to make the change permanent:
- Open YaST.
- Under "System", select Boot Loader.
- In the "Section Management" tab, double-click on the OpenSUSE section you normally use.
- In the "Optional Kernal Command Line Parameter" field, add "radeon.modeset=0" to the end of the list of parameters (see screenshot below).
- Click the OK button of the Section Management dialog to save your changes.
- Click OK to close the Boot Loader Settings dialog.
- Close YaST.

Other things that sort of worked:
- Using startup option "nomodeset": it works, but then I can't use my monitor's native resolution.
- Booting in failsafe mode: works for the same reason; has the same drawback.
Things that didn't work:
- Installing the proprietary Catalyst driver: seems to have prevented KDE from loading.
- Using startup option "radeon.modeset=1". I still got the error. Maybe if I changed some other things around too, this might work. Don't know.
Disclaimer:
I don't really know what I'm doing with this stuff. Somebody who has a better understanding of the inner workings of Linux might have a better solution, or know how to make the things that didn't work for me succeed. But if you're not that person, and this fix works for you, great.
Hej då!
Subscribe to:
Posts (Atom)